
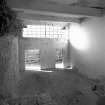
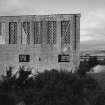
Dalbeattie, Royal Naval Armaments Depot, Nitro-glycerine Works


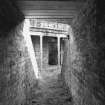
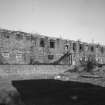
Scanned image of Interior. Press House (building 92), general view from E.
View in Canmore
View in Canmore

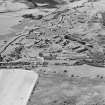
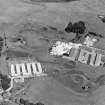
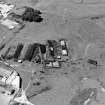
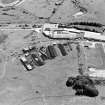
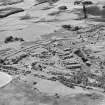
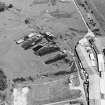
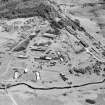
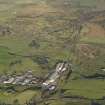
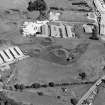
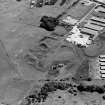
Oblique aerial view centred on Unit 1 of the explosives works and armament depot, taken from the SE.
View in Canmore
View in Canmore

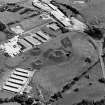
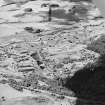
Oblique aerial view centred on Unit 1 of the explosives works and armament depot with railway and tramway/road viaducts adjacent, taken from the NW. In the foreground is a further tramway bridge.
View in Canmore
View in Canmore

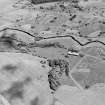
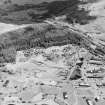
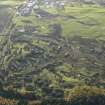
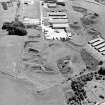
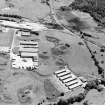
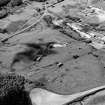
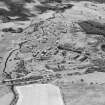
Oblique aerial view centred on part of Unit 2 of the explosives works and armament depot (W of Kirkgunzeon Lane) showing the surviving production houses and earthworks, taken from the WSW.
View in Canmore
View in Canmore

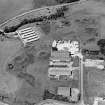
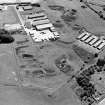
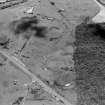
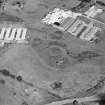
Oblique aerial view centred on Unit 2 of the explosves works and armament depot, showing the earthworks for burette houses and charge houses taken from the SSE.
Also visible is Edingham Industrial estate with Edingham farm poultry houses.
View in Canmore
View in Canmore

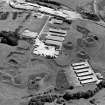
Oblique aerial view centred on Unit 2 of the explosives works and armament depot, showing the earthworks for the burette and charge houses with a type 24 pillbox. taken from the SW.
Also visible is Edingham Industrial Estate with Edingham farm poultry houses.
View in Canmore
View in Canmore

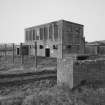
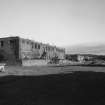
View. North canteen and Acetone Tower, (buildings 214 and 215) from SW.
View in Canmore
View in Canmore

View. Showing Acetone Recovery House with Incoproration and Press houses (building 6) from SE.
View in Canmore
View in Canmore

View. Acetone Recovery House (broad), building 243 from SE.
View in Canmore
View in Canmore

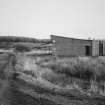
View. Incorporation Houses and air-raid shelter, (building 239) from W.
View in Canmore
View in Canmore

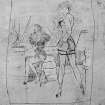
Scanned Image. Interior.
Incorporation House, Dalbeattie. Detail of 1940's period pencil graffiti.
View in Canmore
View in Canmore

Oblique aerial view centred on Unit 2 of the explosives works and armament depot showing the production houses and loading bank, taken from the NW.
View in Canmore
View in Canmore

Oblique aerial view centred on Unit 2 of the explosives works and armament depot, shwoing incorporation houses and observation tower taken from the SE.
View in Canmore
View in Canmore

Oblique aerial view centred on Unit 2 of the explosves works and armament depot, showing the earthworks for burette houses and charge houses and a type 24 pillbox taken from the N.
Also visible is Edingham Industrial estate with Edingham farm poultry houses.
View in Canmore
View in Canmore

Oblique aerial view centred on Unit 2 of the explosves works and armament depot, showing the earthworks for burette houses and charge houses taken from the NW. In the background is the S canteen and loading banks
Also visible is Edingham Industrial estate with Edingham farm poultry houses.
View in Canmore
View in Canmore

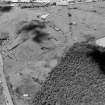
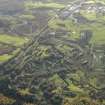
Oblique aerial view centred on the S part of the explosives works and armament depot showing the magazine area with earthworks for internal tranway system from the SE.
View in Canmore
View in Canmore

Detail. Incorporation Houses, building 91 showing escape tunnel and embankment from W.
View in Canmore
View in Canmore

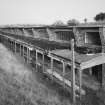
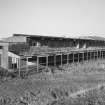
View. Incorporation Houses, building 73 from SW.
View in Canmore
View in Canmore

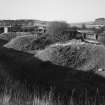
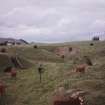
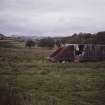
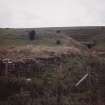
View. Earth covered magazines at S end of site.
View in Canmore
View in Canmore

Oblique aerial view centred on Unit 2 of the explosives factory, taken from the S.
View in Canmore
View in Canmore

Oblique aerial view centred on Unit 1 of the explosives works and armament depot, taken from the NE.
View in Canmore
View in Canmore

Oblique aerial view centred on Unit 2 of the explosives works and armament depot, showing the former canteen and gun cotton laoding station with five production houses, air-raid shelters and an observation tower, taken from the NNW.
View in Canmore
View in Canmore

Oblique aerial view centred on Unit 2 of the explosives works and armament depot, showing the earthworks for the charge houses with in the background the S canteen and loading banks. taken from the NW.
Also visible is Edingham Castle, Edingham Industrial Estate with Edingham farm poultry houses.
View in Canmore
View in Canmore

View of Expansion Mgazines and roof of Incorporation house (building 93) with Acetone Recovery building in the background from SE.
View in Canmore
View in Canmore

View. Incorporation Houses from the expansion magazine, (building 91) with looking through blast tunnel from W.
View in Canmore
View in Canmore

View. Acetone Recovery House (broad), (building 243) from E.
View in Canmore
View in Canmore

View. Showing steam pipe supports with now demolished Acetone Recovery building in distance from SW.
View in Canmore
View in Canmore

Scanned image of View. North canteen rear elevation with external metal fire escape (building 214) from SE.
View in Canmore
View in Canmore

Oblique aerial view centred on Unit 1 of the explosives works and armament depot, taken from the SE.
View in Canmore
View in Canmore

Oblique aerial view centred on Unit 2 of the explosives works and armament depot showing the production houses, air-raid shelters and canteen (S) and loading bank, taken from the WSW.
View in Canmore
View in Canmore

Oblique aerial view centred on the S part of the explosives works and armament depot showing the magazine area with earthworks for internal tranway system from the S.
View in Canmore
View in Canmore

Oblique aerial view centred on the S part of the explosives works and armament depot showing the magazine area with earthworks for internal tranway system from the E. In the background is part of Unit 2 with the S canteen and railway loading bank.
View in Canmore
View in Canmore

View of building 214 from S.
View in Canmore
View in Canmore

View. Shifting room and stretcher point, building 231 from W.
View in Canmore
View in Canmore

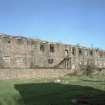
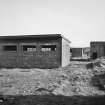
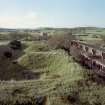
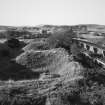
View. Row of Incorporation Houses, (building 92) from SW.
View in Canmore
View in Canmore

Interior.
Drying House, building 30, showing detail of air vent in side corridor.
View in Canmore
View in Canmore

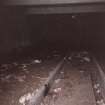
Interior. Magazine showing tramway and coated stop and side protection. S end of site.
View in Canmore
View in Canmore

Scanned image. View of Incorporation House with Expansion Magazines (building 93) from NE. An Acetone Recovery House is in the background.
View in Canmore
View in Canmore

Oblique aerial view centred on Unit 2 of the explosives factory, taken from the SW.
View in Canmore
View in Canmore

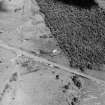
Oblique aerial view centred on part of Unit 1 of the explosives works and armament depot showing the associated earthworks to the N, taken from the W.
View in Canmore
View in Canmore

Oblique aerial view centred on Unit 1 of the explosives works and armament depot, showing the production buildings and earthworks for the internal tramway system, taken from the WNW.
View in Canmore
View in Canmore

View of building 93 from E.
View in Canmore
View in Canmore

Detail. Press House shoing the cuts in the concrete floor of the external corridor for the trmway railsw.(building 30) from E.
View in Canmore
View in Canmore

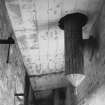
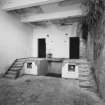
Interior.
Press Room of Incorpration House, (building 92), general view shwoing raised platform, steps and concrete beams from W.
View in Canmore
View in Canmore

Scanned image. Detail of covered walkway of incorporation house (building 91), showing escape tunnel from S.
View in Canmore
View in Canmore

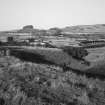
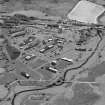
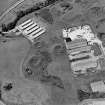
Scanned image of Unit 1, part of Dalbeattie, Royal Naval Armament Depot/Edingham Nitro-glycerine works from SE.
View in Canmore
View in Canmore

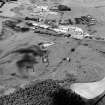
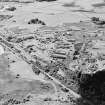
General oblique aerial view centred on Unit 1 of the explosives factory, taken from the NNE.
View in Canmore
View in Canmore

Oblique aerial view centred on Unit 2 of the explosives factory, taken from the SSW.
View in Canmore
View in Canmore

Oblique aerial view centred on Unit 1 of the explosives works and armament depot, taken from the E.
View in Canmore
View in Canmore

Oblique aerial view centred on Unit 2 of the explosves works and armament depot, showing the earthworks for burette houses and charge houses with a type 24 pillbox, taken from the NW.
Also visible is Edingham Industrial estate with Edingham farm poultry houses.
View in Canmore
View in Canmore

Oblique aerial view centred on the S part of the explosives works and armament depot showing the magazine area with earthworks for internal tranway system from the S.
View in Canmore
View in Canmore

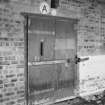
Interior.
Incorporation House, building 74, detail of door.
View in Canmore
View in Canmore

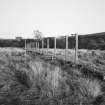
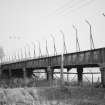
View of original GSWR rail bridge from SW. Visible are the later World War II boundary fence poles.
View in Canmore
View in Canmore

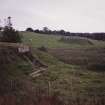
View. SW end of site, magazines, course of internal tramway and observation post.
View in Canmore
View in Canmore

View. Magazines on the S side of the B793 at S end of site.
View in Canmore
View in Canmore

View. Single exposed magazine at S end of site.
View in Canmore
View in Canmore

General oblique aerial view centred on Unit 1 of the explosives factory, taken from the N.
View in Canmore
View in Canmore

Oblique aerial view centred on Unit 2 of the explosves works and armament depot, showing the earthworks for burette houses and charge houses taken from the SSE.
Also visible is Edingham Industrial estate with Edingham farm poultry houses.
View in Canmore
View in Canmore

Oblique aerial view centred on Unit 2 of the explosves works and armament depot, showing the earthworks for burette houses and charge houses taken from the NW.
Also visible is Edingham Castle, Edingham Industrial estate with Edingham farm poultry houses.
View in Canmore
View in Canmore

Oblique aerial view centred on Unit 2 of the explosives works and armament depot, showing the earthworks for the charge houses,. taken from the SW.
Also visible is Edingham Castle, Edingham Industrial Estate with Edingham farm poultry houses.
View in Canmore
View in Canmore

Oblique aerial view centred on Unit 2 of the explosives works and armament depot, showing the earthworks for the charge houses taken from the S.
Also visible is Edingham Castle, Edingham Industrial Estate with Edingham farm poultry houses.
View in Canmore
View in Canmore

Oblique aerial view centred on the S part of the explosives works and armament depot showing the magazine area, cordite loading station and the earthworks for internal tranway system from the NE.
View in Canmore
View in Canmore

View. North canteen (building 214) from SW showing external metal stairs on rear elevation. In the distance the gun cotton unloading station with the general goods station and loading platforms. .
View in Canmore
View in Canmore

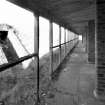
View. Incorporation House with extant ventilators (building 30) from SW. View from tramway embankment and junction looking to curved concrete bridge over the Knock Burn
View in Canmore
View in Canmore

View. Incorporation Houses (double side), building 239 from SE.
View in Canmore
View in Canmore

Oblique aerial view centred on Unit 1 of the explosives works and armament depot with adjacent railway and tramway/road viaducts, taken from the SSE.
View in Canmore
View in Canmore

Oblique aerial view centred on Unit 1 of the explosives works and armament depot, taken from the ESE.
View in Canmore
View in Canmore

Oblique aerial view centred on Unit 2 of the explosives works and armament depot, showing the earthworks for burette houses and charge houses and type 24 pillbox taken from the W.
Also visible is Edingham Industrial estate with Edingham farm poultry houses.
View in Canmore
View in Canmore

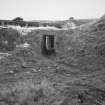
View. Entrance to underground magazine with a second in the foreground at S end of site.
View in Canmore
View in Canmore

Detail. Sign on magazine with ventialtor at S end of site.
View in Canmore
View in Canmore


You may copy, display, store and make derivative works for personal use or use solely within an educational institution by staff and students, under these conditions: the ScotlandsPlaces website is attributed, there is no commercial use or sale, and no public distribution (for example, by hand, email, or web). Full licence details.
Details
Organisation: Historic Environment Scotland (HES)
Alternative name(s): Edingham Industrial Estate; Kirkgunzeon Lane; Edingham Munitions Factory
Canmore ID: 76279
Site type: Armament Depot (20th Century), Graffiti (21st Century)
County: Kirkcudbrightshire
Parish: Urr
Council: Dumfries And Galloway