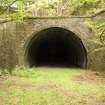
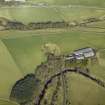
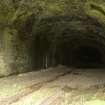
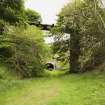
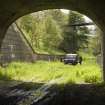
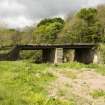
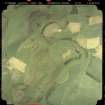
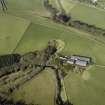
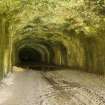
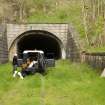
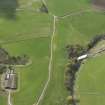
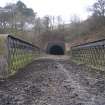
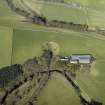
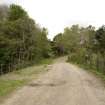
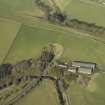
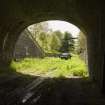
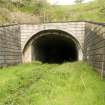
ScotlandsPlaces Home

Scotlands Places

Bowshank Tunnel


  • Oblique aerial view centred on S end of Bowshank Tunnel, foootbridge and bridge over the Gala Water, taken from the SE. RCAHMS Aerial Photography Digital Date 20/2/2007 Copyright RCAHMS
  • Oblique aerial view centred on S end of Bowshank Tunnel, foootbridge and bridge over the Gala Water, taken from the S. RCAHMS Aerial Photography Digital Date 20/2/2007 Copyright RCAHMS
  • Oblique aerial view centred on S end of Bowshank Tunnel, foootbridge and bridge over the Gala Water, taken from the SSE. RCAHMS Aerial Photography Digital Date 20/2/2007 Copyright RCAHMS
  • Oblique aerial view centred on S end of Bowshank Tunnel, foootbridge and bridge over the Gala Water, taken from the SE. RCAHMS Aerial Photography Digital Date 20/2/2007 Copyright RCAHMS
  • Detail.  N entrance of tunnel showing arch and abutments from NW. RCAHMS digital photography Date 24/5/2007 Copyright RCAHMS
  • Detail.  Showing tunnel painted number. RCAHMS digital photography Date 24/5/2007 Copyright RCAHMS
  • View.  From SE from railway bridge over Gala Water looking to farm access footbridge and S entrance to tunnel. RCAHMS digital photography Date 24/5/2007 Copyright RCAHMS
  • View.  From SSE showing S entrance to tunnel and farm access footbridge. RCAHMS digital photography Date 24/5/2007 Copyright RCAHMS
  • Detail.  From SSE showing S end of tunnel and rebuilt tunnel mouth.  Land Rover from Soil Investigation team part of Waverley Line rebuilding Project. RCAHMS digital photography Date 24/5/2007 Copyright RCAHMS
  • Detail.  S entrance rebuilt arch and abutments from SE. RCAHMS digital photography Date 24/5/2007 Copyright RCAHMS
  • Interior.  Of tunnel from S entrance. RCAHMS digital photography Date 24/5/2007 Copyright RCAHMS
  • Interior.  From SE of tunnel. RCAHMS digital photography Date 24/5/2007 Copyright RCAHMS
  • View.  From NW looking from inside tunnel to farm access footbridge.  Land Rover from Soil Test team part of Waverley Line rebuilding Project. RCAHMS digital photography Date 24/5/2007 Copyright RCAHMS
  • Interior.  From inside tunnel looking SE to farm access footbridge, from NW. RCAHMS digital photography Date 24/5/2007 Copyright RCAHMS
  • Vertical aerial view showing the course of The Waverley Line including Bowshank Tunnel and bridges. Scottish Development Department: Commissioned Aerial Imagery Date 14/5/1992 Copyright RCAHMS


You may copy, display, store and make derivative works for personal use or use solely within an educational institution by staff and students, under these conditions: the ScotlandsPlaces website is attributed, there is no commercial use or sale, and no public distribution (for example, by hand, email, or web). Full licence details.

Oblique aerial view centred on S end of Bowshank Tunnel, foootbridge and bridge over the Gala Water, taken from the SE. RCAHMS Aerial Photography Digital Date 20/2/2007 Copyright RCAHMS
Item DP025652

Organisation

The Royal Commission on the Ancient and Historical Monuments of Scotland

Alternative Name(s)

THE WAVERLEY LINE; EDINBURGH TO HAWICK BRANCH RAILWAY

Canmore ID

283845

Site Type

RAILWAY TUNNEL

County

MIDLOTHIAN

Parish

STOW

Council

SCOTTISH BORDERS, THE

NGR

NT 45339 41262

Latitude, Longitude

55.661783N, 2.870406W

Images

Archaeological Notes
NT44SE 28.04 from 45276 41338 to 45381 41171

Railway Tunnel about 195m in length under 600m high promontory of land with Bowshank farmsteading on top.
The Tunnel has a stone-faced portal at the N end only and is mainly brick lined. The N portal is in random rubble whilst the S entrance is of imitation rustication in shuttered concrete. There is evidence of repairs to the stone and brickwork at the N end, on the W side the strone quoins have been replaced with brick and the S portal has a secondary entrance in concrete providing evidence of major repair work or strengthening. The tunnel is numbered No.75.
There are several linesman's alcoves near the S entrance.

Photographed in 2007 as part of a survey of Waverley Line remains in advance of proposed rebuilding of the railway and to enhance and augment the existing holdings of the National Monuments Record Scotland.
Information from RCAHMS (DE), April 2007

Related Material Information - Bibliographical References


Caplan, N (1985) The Waverley Route, Weybridge.

Related Material Information - Description of Collections


Digital Images

DP025652 (20/2/2007)
Oblique aerial view centred on S end of Bowshank Tunnel, foootbridge and bridge over the Gala Water, taken from the SE. RCAHMS collection RCAHMS Aerial Photography Digital
DP025651 (20/2/2007)
Oblique aerial view centred on S end of Bowshank Tunnel, foootbridge and bridge over the Gala Water, taken from the S. RCAHMS collection RCAHMS Aerial Photography Digital
DP025650 (20/2/2007)
Oblique aerial view centred on S end of Bowshank Tunnel, foootbridge and bridge over the Gala Water, taken from the SSE. RCAHMS collection RCAHMS Aerial Photography Digital
DP025649 (20/2/2007)
Oblique aerial view centred on S end of Bowshank Tunnel, foootbridge and bridge over the Gala Water, taken from the SE. RCAHMS collection RCAHMS Aerial Photography Digital
DP026046 (24/5/2007)
Detail. N entrance of tunnel showing arch and abutments from NW. RCAHMS collection RCAHMS digital photography
DP026045 (24/5/2007)
Detail. Showing tunnel painted number. RCAHMS collection RCAHMS digital photography
DP026042 (24/5/2007)
View. From SE from railway bridge over Gala Water looking to farm access footbridge and S entrance to tunnel. RCAHMS collection RCAHMS digital photography
DP026041 (24/5/2007)
View. From SSE showing S entrance to tunnel and farm access footbridge. RCAHMS collection RCAHMS digital photography
DP026039 (24/5/2007)
Detail. From SSE showing S end of tunnel and rebuilt tunnel mouth. Land Rover from Soil Investigation team part of Waverley Line rebuilding Project. RCAHMS collection RCAHMS digital photography
DP026038 (24/5/2007)
Detail. S entrance rebuilt arch and abutments from SE. RCAHMS collection RCAHMS digital photography
DP026037 (24/5/2007)
Interior. Of tunnel from S entrance. RCAHMS collection RCAHMS digital photography
DP026036 (24/5/2007)
Interior. From SE of tunnel. RCAHMS collection RCAHMS digital photography
DP026035 (24/5/2007)
View. From NW looking from inside tunnel to farm access footbridge. Land Rover from Soil Test team part of Waverley Line rebuilding Project. RCAHMS collection RCAHMS digital photography
DP026034 (24/5/2007)
Interior. From inside tunnel looking SE to farm access footbridge, from NW. RCAHMS collection RCAHMS digital photography

Scanned Images

SC947710 (14/5/1992)
Vertical aerial view showing the course of The Waverley Line including Bowshank Tunnel and bridges. RCAHMS collection Scottish Development Department: Commissioned Aerial Imagery

Related OS 6-inch maps


Related OS 25-inch maps